- CompressConvertAI PDF
- Organize
- View & Edit
- Convert from PDF
- Convert to PDF
- SignMoreScan
How to Design, Create, & Edit a Brochure
Learn how to make a brochure, export it as a PDF, and refine it with Smallpdf for print or sharing.
More on PPT to PDF
More on PDF to PPT
You don‘t need to be a pro graphic designer to make a great PowerPoint brochure. With the right tools and steps, you can easily design, create, and edit your own brochure.
Below, we’ll walk you through step-by-step on how to make a PowerPoint brochure, set up sizes and folds, export it as a PDF, and edit that PDF with Smallpdf.
Quick Steps: Make a Brochure and Save as PDF
What Is a Brochure?
A brochure is a printed or digital marketing tool that businesses use to convey information about their products, services, or company. Think of it as your storytelling medium for potential customers, packed with engaging text, visuals, and details that persuade readers to take action.
Businesses use brochures for:
Marketing and promotion (e.g., showcasing special offers or new products)
Informing and educating (e.g., providing product specifications or tips)
Event promotion (e.g., encouraging attendance at industry events)
Building brand awareness (e.g., highlighting mission, vision, and impact)
Now that you know why brochures matter, here’s a step-by-step guide on how to create a PowerPoint brochure.
How to Design a Brochure (Step-by-Step)
Creating an effective brochure follows a clear process from concept to completion. Here’s your roadmap to designing brochures that grab attention and drive results.

Step 1: Define Purpose, Audience, and Call-to-Action
Before you touch PowerPoint, decide who you are speaking to and what you want them to do.
Who is this brochure for? (Customers, partners, or event attendees?)
What’s the key message? (Highlight your services, share testimonials, or explain a new product?)
What action do you want readers to take? (Visit your website, call your office, or sign up for a subscription?)
Clearly defining your purpose and audience will set the foundation for an effective, targeted design.
Step 2: Set Slide Size and Orientation for Your Brochure
Open PowerPoint and set up the correct canvas for print.
Go to “Design” > “Slide Size” > “Custom Slide Size.”
For a common tri-fold brochure, you can use something close to letter size, such as 11 x 8.5 inches or your printer’s recommendation. Use landscape orientation if you plan to fold panels.
This step keeps your panels aligned with how the printer will trim and fold the brochure.
Step 3: Choose a PowerPoint Template or Create a Simple Grid
You can start from:
A built-in PowerPoint template
A downloaded brochure template
A blank slide with guides
For a blank layout, turn on “Guides” and “Gridlines” under the “View” tab.
Add vertical guides to divide the slide into panels for tri-fold or bi-fold layouts. This grid makes it easier to keep text boxes, logos, and images aligned.
If you use a template, remove placeholder text and replace it with your own copy, keeping the structure but adjusting fonts and colors.
Step 4: Add Headlines, Copy, and Images
Begin with the front panel, since it is the first thing people see.
Use short, benefit-focused headlines like “Trusted IT Support for Small Businesses” instead of vague slogans.
Keep body text in short paragraphs and use line breaks, not long blocks. Place key information such as services, benefits, and contact details on inner panels where there is more space.
Insert high-resolution images or icons that support your message. Avoid stretching small images, since they will look blurry when you export your brochure as a PDF.
Step 5: Apply Brand Colors and Typography
Your PowerPoint brochure should match your brand identity. Use your logo colors for accents, section headers, and call-to-action buttons.
In the “Design” tab, you can customize “Colors” and “Fonts,” so your brand style stays consistent across slides.
We recommend one font for headlines and one for body text to keep the brochure readable.
Check contrast between text and background so your brochure remains clear on screen and on paper.
Step 6: Check Alignment, Spacing, and Readability
Turn on “Guides” and “Gridlines” again and adjust any elements that drifted out of alignment. Make sure margins are not too close to the slide edges so nothing is cut off when printed. Read through the brochure out loud to spot awkward phrases or missing details.
If possible, ask a colleague to review the brochure for clarity and typos before you export it.
Step 7: Export Your PowerPoint Brochure as a PDF
Once your design looks good, convert it to a PDF for printing or digital sharing.
In PowerPoint, go to “File” > “Save As” or “Export,” then choose “PDF.”
Select “Standard” quality for print, or “Minimum size” for basic digital use.
After export, you can drag and drop the PDF into Smallpdf to:
Edit text and images with Edit PDF.
Add highlights and comments with PDF Annotator.
Shrink file size with Compress PDF.
Merge it with other pages using Merge PDF.
This PowerPoint to PDF workflow gives you the flexibility to adjust your brochure even after export.
Layout Tips and Template Ideas for PowerPoint Brochures
The way you organize panels matters just as much as your visuals. In PowerPoint, the grid and slide structure make it easier to plan sequences.
For a tri-fold brochure, you can use three columns on one slide. The front cover, back cover, and inner flap sit on the same side, while the inside panels form a spread on the reverse.
For a bi-fold layout, divide the slide into two equal panels with a strong visual on the front and more detailed content inside.
If you work with multiple brochure types, keep a small library of PowerPoint templates:
A corporate overview brochure template
A product or service menu template
An event or conference program template
You can duplicate these files and update the content for each campaign while keeping a consistent look.
Popular Brochure Categories by Industry
Different industries have specific brochure needs and audience expectations. Here’s what works best for common business sectors:
Real Estate: Property listings, agent profiles, neighborhood guides, market reports
Healthcare: Service offerings, patient education, facility tours, insurance information
Education: Course catalogs, campus maps, program highlights, admission requirements
Travel & Tourism: Destination guides, package deals, itineraries, local attractions
Food & Restaurant: Menus, catering options, special events, chef profiles
Professional Services: Capabilities overviews, case studies, team bios, testimonials
Technology: Product specifications, feature comparisons, implementation guides
Nonprofit: Mission statements, impact stories, volunteer opportunities, donation appeals
PowerPoint Brochure Sizes, Formats, and Folds
Choosing the right size and fold type affects both your design approach and printing costs. Here’s what you need to know about popular brochure formats:
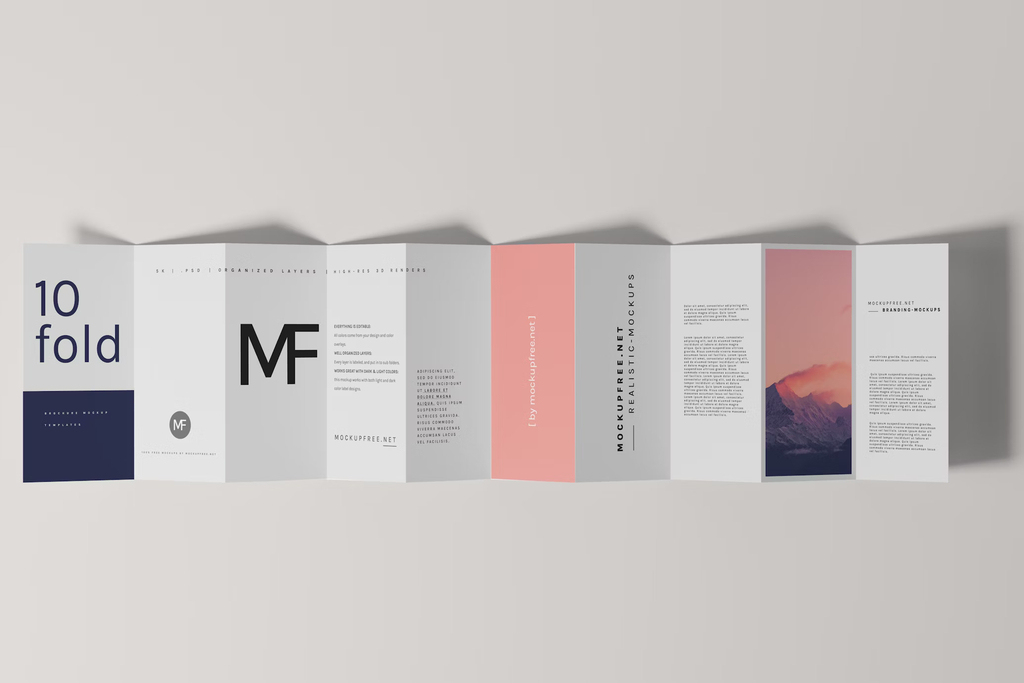
Tri-Fold vs. Z-Fold vs. Bi-Fold
Tri-fold brochures create six panels when folded, perfect for organizing information into digestible sections like services, benefits, and contact details. The panels fold inward, creating a compact final size that fits standard business envelopes.
Z-fold brochures also have six panels but fold in a zigzag pattern, allowing readers to unfold sections progressively. This format works brilliantly for step-by-step processes or storytelling that builds to a conclusion.
Bi-fold brochures create four panels with a single fold down the middle. They offer more space per panel for larger images and detailed content, making them ideal for portfolios or product showcases.
Standard Sizes (Letter, Legal, Tabloid)
Most brochures use these standard paper sizes:
Letter size (8.5” x 11“): Most common and cost-effective for business brochures
Legal size (8.5” x 14“): Extra length for detailed information or longer tri-folds
Tabloid size (11” x 17“): Large format for visual impact and trade show displays
PowerPoint Brochures: Brand Elements and Typography
Consistent branding transforms a simple brochure into a powerful marketing asset. Your color palette should reflect your brand identity while ensuring sufficient contrast for readability.
Typography hierarchy guides readers through your content naturally. Use no more than two or three font families—typically one for headlines and another for body text. Popular pairings include serif headlines with sans-serif body text for classic appeal.
Do:
Maintain consistent spacing between elements
Use your brand colors strategically for emphasis
Ensure text contrast meets accessibility standards
Don’t:
Mix too many font styles or colors
Use decorative fonts for large blocks of text
Ignore your brand guidelines for creative freedom
Exporting, Editing, and Sharing Your PDF Brochure
Export your PowerPoint brochure with our PPT to PDF converter. Once you do that, Smallpdf can help you polish and share it.
Upload the PDF to Edit PDF to tweak headlines, fix small typos, or adjust image placement without going back to PowerPoint. Use Compress PDF if you plan to email the brochure or host it on your website, so it loads quickly.
If you collaborate with teammates, PDF Annotator lets them highlight sections, leave comments, and mark suggestions directly on the brochure. You can import and export files from Google Drive, Dropbox, or OneDrive to keep everything in sync.
For sales teams or agencies, Sign PDF helps you add signatures or approval blocks to a brochure for internal review. To keep your marketing assets secure, you can use Protect PDF to add a password before sharing files with external partners or printers.
Printing and Technical Settings for PDF Brochures
Good printing starts with good export settings. For professional print jobs, we recommend:
Using high-resolution images (at least 300 DPI) in PowerPoint
Leaving enough margin for trim and folds
Checking that the text is not too close to the edges or fold lines
Your printer may request specific bleed and crop mark settings. For online orders, export the PowerPoint file to PDF, then upload that PDF. If needed, you can use Smallpdf to compress or repair the file before sending it on.
For digital brochures that live on your site or in email campaigns, file size matters more than bleed. Compress the PDF, then test it on desktop and mobile to make sure text and images look sharp.
Related Marketing Collateral
Brochures work best as part of a cohesive marketing system. Consider creating these complementary materials:
Rack cards: Compact promotional pieces perfect for display stands and countertops
Flyers: Single-page announcements for events, sales, or new product launches
Postcards: Direct mail pieces that combine visual impact with targeted messaging
Sell sheets: One-page product summaries with key features and benefits
Pamphlets: Multi-page informational pieces for detailed explanations or instructions
Maintaining consistent branding across all materials reinforces your professional image and builds recognition.
Create a Quick, Professional PowerPoint Brochure
PowerPoint is a practical starting point for brochure design, especially if you want an editable file that anyone on your team can open.
Once you set the right slide size, choose a suitable template, and organize your panels, you can export a clean PDF and refine it with Smallpdf.
From simple edits and comments to compression, protection, and signatures, we help you handle every stage of the brochure workflow in one place.
Want to Edit a Brochure for Free
Frequently Asked Questions
Can I design a professional brochure using PowerPoint?
Yes, you can. PowerPoint gives you enough control over layout, fonts, and images to build a clean brochure, especially when you use guides and templates. Exporting to PDF and editing with Smallpdf helps you reach print-ready quality.What is the best size for a PowerPoint brochure?
Most business brochures use letter-style dimensions, such as 11 x 8.5 inches in landscape for tri-fold layouts. You can set this under “Design” > “Slide Size” > “Custom Slide Size” to match your printer’s recommendations.How do I turn my PowerPoint brochure into a PDF?
Go to “File” > “Save As” or “Export” in PowerPoint, then choose “PDF” as the format. After that, upload the PDF to Smallpdf to edit, compress, secure, or merge it with other pages as needed.Can I edit my brochure PDF later without going back to PowerPoint?
Yes. With Smallpdf Edit PDF, you can adjust text, move elements, and insert new images directly in your PDF. This is useful for small corrections or localized versions of the same brochure.How can I share my PowerPoint brochure with clients online?
Export your brochure as a PDF, compress it if the file is large, and then share it via a secure Smallpdf link, email, or your cloud storage service. This keeps the layout consistent on any device.Create and edit brochure PDFs using Smallpdf Pro
Related Articles
