- CompressConvertAI PDF
- Organize
- View & Edit
- Convert from PDF
- Convert to PDF
- SignMoreScan
- Home
- ›
- ›How To Sign PDF in Preview Mac (Step-By-Step Guide)
How To Sign PDF in Preview Mac (Step-By-Step Guide)
Need to sign a PDF file on Mac today? Preview makes it quick, and we’ll show you the best way to add a signature that looks right and saves properly.
Preview comes with macOS, so you can sign without installing anything. It works best for everyday documents where you just need an electronic signature placed on the page.
To keep this simple, we’ll start with the native Preview method first. Then we’ll cover troubleshooting, signature management, and when you might want a more advanced signing workflow.
Quick Checklist: Sign a PDF File on Mac Using Preview
Sign PDF File on Mac in Preview: Step-by-Step Guide
Preview’s signing feature lives in Markup. Once you know where it is, signing becomes repeatable.
Step 1: Open the PDF in Preview
You can open a PDF in a few different ways.
Double-click the PDF if Preview is your default PDF viewer.
Right-click the PDF, then click “Open With” > “Preview.”
Press Command + Space, type “Preview,” press Return, then open the PDF from “File” > “Open.”
If the file opens in another app, don’t worry. Just use “Open With” to switch it to Preview.
Step 2: Turn On the Markup Toolbar
The signing option only shows once Markup is visible.
Look near the top of the Preview window.
Click the “Show Markup Toolbar” button. It looks like a pen tip inside a circle.
You’ll see a new row of icons appear. This is where “Sign” lives.
Step 3: Open the Signature Menu
Now you’re ready to access saved signatures or create a new one.
Click the “Sign” icon (fountain pen).
If you’ve created signatures before, you’ll see them listed.
If you haven’t, you’ll see “Create Signature.”
Tip: If “Sign” is greyed out, skip ahead to the troubleshooting section. The PDF may be locked or restricted.
Step 4: Create a Signature in Preview
Preview lets you capture your signature three ways. Pick the one that matches your setup.
Trackpad method
Click “Create Signature.”
Select “Trackpad.”
Click “Click Here to Begin.”
Sign using your finger or a stylus.
Press any key when you’re done.
Trackpad signatures are fast, but they can look shaky. If you want cleaner lines, the camera method usually looks better.
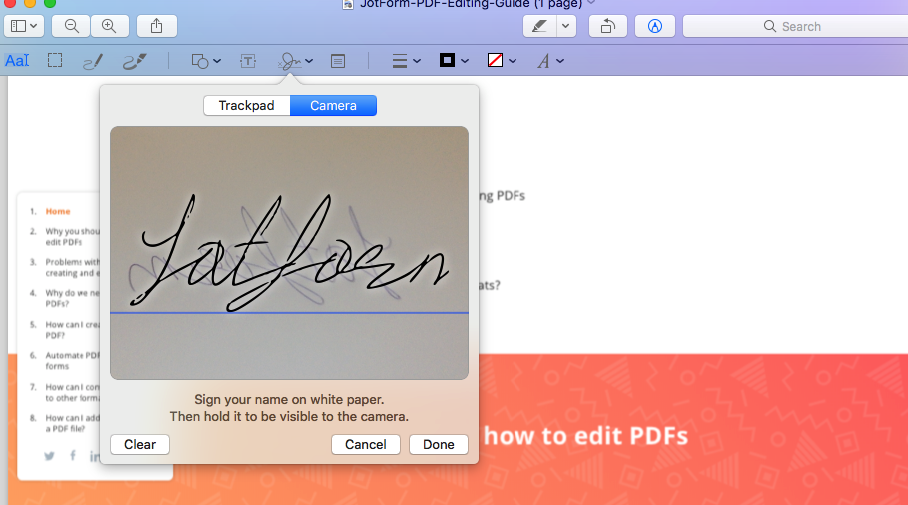
Camera method
Click “Create Signature.”
Select “Camera.”
Sign your name on clean white paper using a dark pen.
Hold it up to your Mac’s camera and align it with the on-screen line.
Wait for the Preview to capture it.
Camera signatures often look closest to your real handwriting. Use good lighting so the edges look crisp.
iPhone or iPad method
If your devices support Continuity and are connected, you may see an iPhone or iPad option.
Click “Create Signature.”
Select “iPhone” or “iPad.”
Sign on the screen, then confirm.
This option is useful if you want more control over your handwriting. If you’re signing with a stylus, it’s also easier to keep your signature consistent.
Step 5: Place Your Signature on the Document
Once your signature exists, you can insert it into the PDF.
Click “Sign,” then choose your signature from the list.
Click on the PDF page where you want it to appear.
Drag the signature into position.
To make it look natural:
Use the corner handles to resize it.
Keep it proportional so it doesn’t look stretched.
Place it on the signature line, not above it.
If your signature lands in the wrong spot, click it once, then drag it to the correct place.
Step 6: Save the Signed PDF Correctly
Saving matters, especially if you don’t want to overwrite the original.
For most cases:
Click “File” > “Save.”
Or press Command + S.
If you want a separate copy:
Click “File” > “Duplicate.”
Then click “File” > “Save” to keep the signed version as its own file.
This is a smart habit for contracts, forms, or anything you may need to resend.
Create a Signature in Preview: Which Method Looks Best?
All three methods work, but they give different results.
Trackpad is the quickest when you just need to sign and move on. It’s not always the cleanest, since your finger can wobble.
Camera capture usually produces a sharper signature because it starts with ink on paper. If you care about appearance, this is often the best choice.
iPhone or iPad signing gives you more control than a trackpad. It’s also easier to repeat the same signature style every time.
If your signature looks thin or jagged, recreate it. Using a darker pen and better lighting makes a bigger difference than most people expect.
Manage Signatures in Preview: Save, Reuse, and Delete
Preview saves signatures automatically once you create them. That’s helpful, but it also means you’ll want to manage them over time.
To view your saved signatures:
Open any PDF in Preview.
Click “Show Markup Toolbar.”
Click “Sign” to see the list.
To delete a signature you don’t want:
Click “Sign” to open the list.
Hover over the signature you want to remove.
Click the “X” next to it.
To reuse a signature:
Open a new PDF.
Click “Sign,” then select the saved signature.
Click to place it.
If you keep multiple versions, name them mentally by use. One might be a full name, another might be initials.
Electronic vs. Digital Signatures: What Preview Can and Can’t Do
Preview adds an electronic signature. That means it places a visual signature on the page, similar to adding an image.
A digital signature is different. It’s certificate-based and designed for verification. It can show if the document was changed after signing, depending on how the signature is set up.
Here’s a clearer comparison.
| Feature | Electronic Signature (Preview) | Digital Signature (Smallpdf) |
|---|---|---|
| What it is | A visual signature placed on the page | A cryptographic signature tied to a certificate |
| How it’s verified | Visual review only | Can be verified by supported PDF readers |
| Change detection | Not built in | Can show if content changed after signing |
| Best for | Simple approvals and everyday documents | Workflows needing verification and compliance |
| Typical requirements | None | Certificates, identity checks, and validation support |
Preview is a great fit when a visual signature is enough. If your document needs verification, auditing, or stricter controls, you’ll want a digital signing workflow instead.
If you’re signing contracts, compliance forms, or anything requiring verification, use Sign PDF for a proper digital signature.
Troubleshooting: Preview Signature Not Working
If signing feels blocked in Preview, it’s usually because of permissions, PDF restrictions, or the way the PDF was created.
1. The Sign Button Is Greyed Out
This often happens when the PDF is locked or has editing restrictions.
Try these fixes:
Check if the PDF asks for a password when opening.
Click “File” > “Get Info” and look for permission hints.
Save a copy first using “File” > “Duplicate,” then try Markup again.
If the document is protected and you have permission to edit it, you can upload it to Unlock PDF to remove restrictions, then open it again in Preview.
2. I Can’t Click or Place the Signature on the Page
This can happen if the page is a scanned image or the PDF layer is unusual.
Try this:
Zoom in to 125% or 150% and click again.
Click the page once to focus it, then place the signature.
If the invoice or form is a scan, create a flatter signature and place it carefully.
If you need the scan to behave more like a normal document, OCR is the step that makes text selectable and searchable. That can be available with Pro features, depending on your plan.
3. My Signature Looks Blurry
Blurry signatures usually come from the way they were captured.
Fix it by recreating the signature:
Use the camera method with a dark pen.
Stand near a window or bright lamp.
Hold the paper steady so the Preview captures sharp edges.
Also, keep the signature size reasonable. If you enlarge it too much, it can look soft.
4. The PDF Won’t Save After Signing
This is usually a permission issue, not a Preview issue.
Try these steps:
Save the file to your Desktop, then try again.
Right-click the file, click “Get Info”, and check permissions at the bottom.
If the PDF is in a shared folder, copy it to a location you own, then sign.
5. My Signature Keeps Moving When I Try to Resize It
This happens when you grab the wrong part of the signature box.
Click once to select the signature.
Use a corner handle to resize.
Drag the signature only after you’re finished resizing.
If the signature is hard to control, zoom in so your cursor has more precision.
When Preview Is Enough and When You’ll Want Smallpdf
Preview is ideal when you need a fast, offline signature and the document doesn’t require advanced verification. For many personal documents, that’s exactly the right fit.
There are times you’ll want more control, especially once you move beyond a single signature on a single file.
Smallpdf can help when you need things that Preview doesn’t handle well, such as:
Signing in a browser across devices, including Windows.
Uploading and saving from Google Drive, Dropbox, and OneDrive.
Cleaning up PDFs before signing, like merging pages or compressing large files.
Protecting signed PDFs with passwords for safer sharing.
Running a more structured signing workflow when you need consistency.
If you already have a signature image and just need to place it cleanly, Edit PDF can help you position it precisely. If your signing needs go beyond basic placement, Smallpdf eSign gives you a smoother path for document signing across platforms.
Sign Your PDF on Mac, Then Keep It Share-Ready
Preview is a solid option when you need to sign a PDF file on Mac without extra setup. Once your signature is saved, signing future documents takes seconds.
If your PDF is locked, oversized, or needs extra cleanup before you send it, Smallpdf can handle the next steps in the same workflow.
Upload from your device, Google Drive, Dropbox, or OneDrive, then download a polished PDF that’s ready to share.
Want to Sign Your PDF Online for Free?
Frequently Asked Questions
Can I sign a PDF in Mac Preview?
Yes. Open the PDF in Preview, click “Show Markup Toolbar,” click “Sign,” then place a saved signature or create a new one.How do I enable signatures in Preview?
Open a PDF, click “Show Markup Toolbar,” then click “Sign.” If you don’t see a signature listed, click “Create Signature.”How do I sign a PDF on a Mac without extra software?
Use Preview. It comes with macOS and lets you create a signature using a trackpad, camera, or connected iPhone or iPad.What’s the difference between electronic and digital signatures?
An electronic signature is a visual mark placed on the document. A digital signature uses certificates and supports verification in compliant workflows.Can Preview request signatures from other people?
No. Preview only lets you add your own signature. If you need a workflow for collecting signatures, Smallpdf eSign is the better option.Can you convert Kindle to PDF on a Mac?
Yes, the same process works on Mac using Calibre and the DeDRM plugin. The steps are identical to Windows.Sign PDF documents securely using Smallpdf Pro
Related Articles
