- CompressConvertAI PDF
- Organize
- View & Edit
- Convert from PDF
- Convert to PDF
- SignMoreScan
- Home
- ›
- ›Enlarge Your PDF Files for Seamless Printing
Enlarge Your PDF Files for Seamless Printing
Enlarge your PDFs for printing. Make your files clearer, easier to read, and ready to impress. We’ll show you how to do it with just a few clicks.
PDF Printing Tips & Guides
More on Edit PDF
PDF Reading Tools & Guides
Printing a document can sometimes feel like a gamble—small fonts, unclear visuals, or awkward layouts can ruin an otherwise perfect file. To enlarge a PDF for printing, you’ll need to adjust the print settings in your PDF viewer.
Most viewers offer options to scale the document to a larger size or print it across multiple pages. Let’s explore the different methods to make your PDFs print exactly how you need them.
Quick Steps to Enlarge a PDF for Printing
Need more control? Scroll down for detailed steps and Smallpdf tips.
How to Enlarge a PDF for Printing (Step-by-Step)
Some things to remember:
If you manually adjust the scale percentage, check the preview to see you aren’t cutting anything off.
Switch to a larger paper size if your printer can handle different sizes.
Check for options like “Actual size” or “Fill Entire Paper” for easier scaling.
Always use the print preview to avoid wasting paper and ink.
Use Custom Scale to Print a PDF Larger
Custom scaling gives you precise control over your print size. Instead of relying on automatic “Fit to Page” settings, you can manually set the exact percentage you want.
Common scale percentages for enlarging PDFs:
125% = Slightly larger text, good for readability
150% = Noticeably bigger, may require larger paper
200% = Double size, often needs poster printing
Custom percentage = Enter any number that fits your needs
Keep in mind that your printer’s margins will limit how much you can enlarge before content gets cut off. Always check the preview first!
Print a Large PDF on Multiple Pages (Poster/Tiling)
This method is perfect for creating posters or banners from regular PDFs. Ever wanted to print a giant poster but only have regular printer paper?
The solution is “tiling.” Tiling splits your PDF into multiple pages that can be printed individually and pieced together later.
Open your file in your favorite PDF reader.
Hit Ctrl+P or Cmd+P to bring up the print dialog box.
Pick Poster under “Page Sizing & Handling.”
Set options for scaling, overlap, cut marks, and labels, if available.
Click Print—and you’re good to go!
Here’s what different tile scales look like:
150% tile scale = Your PDF prints across 2 pages
200% tile scale = Your PDF prints across 4 pages
300% tile scale = Your PDF prints across 9 pages
Pro tip: Set the overlap to about 0.2 inches so you have room to align and tape the pages together perfectly. Cut marks help you see exactly where to trim for a seamless finish.
Not all PDF readers and printers support this feature, so if you can’t find a “Poster” option—or it is greyed out—try another reader.
Platform-Specific Instructions
Different operating systems and programs have slightly different interfaces, but the core concept remains the same. Here’s how to enlarge PDFs on the most common platforms.
Windows (Chrome, Edge)
On Windows, open the PDF and head to the print dialog, or hit Ctrl+P. Look for options like “Fit,” “Custom Scale,” or “Scale to Fit.”
These settings let you adjust the size to fit your needs. The interface may look a little different depending on the program you opened the PDF with, but there will always be a scaling feature. Just take a moment to explore, and you’ll find it.
Chrome and Edge both work great for basic PDF enlarging. Just open your PDF in the browser, hit Print, and look for scaling options.
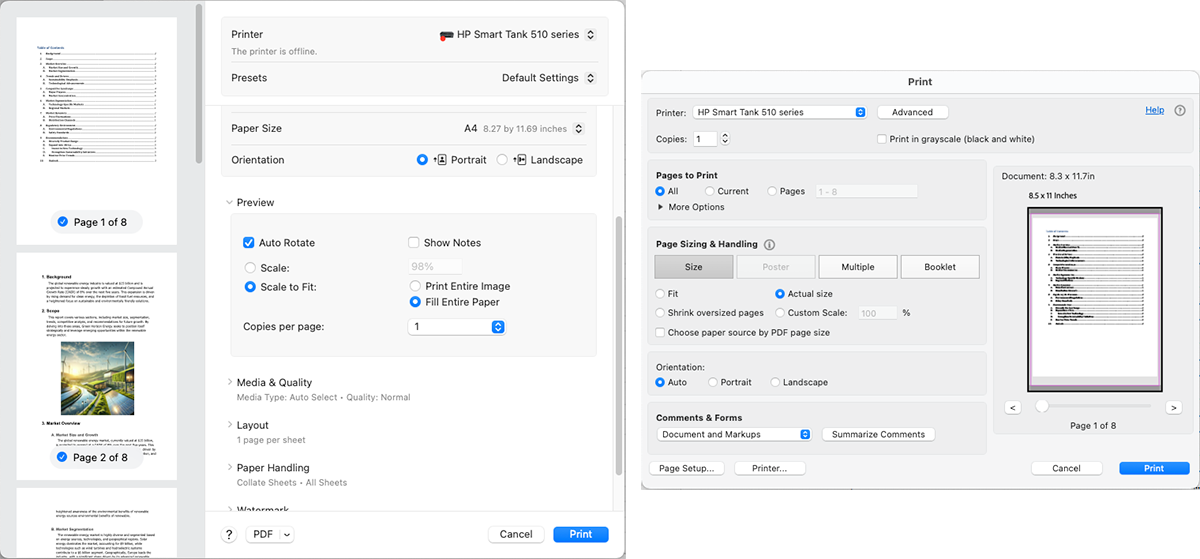
Mac (Preview)
On a Mac, open the PDF in Preview and go to the print settings (or Cmd+P). You’ll find scaling options under the “Preview” section, with options like “Scale,” “Scale to Fit,” and “Fill Entire Paper.” It’s all pretty straightforward, just play around with the different options to see which gives the best results.
Preview comes pre-installed on all macOS versions, and it’s totally free to use. While it’s great for resizing PDFs, it doesn’t have options for “Tiling” or “Poster” printing.
Other Ways to Enlarge a PDF Before Printing
Sometimes you need to make changes to the PDF itself rather than just adjusting print settings. Here are a couple of alternatives.
Make Text Larger with Smallpdf Edit PDF
There is no pinch to zoom on paper, but if you’re struggling to read the text in your PDF, don’t worry, it’s easy to fix. Enlarging the font can make a huge difference for readability and overall presentation, saving everyone from reaching for a magnifying glass.
Open your PDF in Smallpdf’s Edit PDF tool.
Check the current font style and size by selecting a block of text.
Adjust the font size as needed.
Click on “Finish” once you’re done.
Download and print your perfectly resized PDF.
Some things to remember:
Altering text with Edit PDF is a Pro feature of Smallpdf. Sign up for a free 7-day trial to see it in action.
You might need to resize the text blocks to fit the larger font.
You might also need to move blocks around, so nothing overlaps.
Sometimes, changing the font style can also make the text easier to read without having to change the font size.
Want to Edit a PDF?
Use Smallpdf’s Online PDF Tools
Beyond editing text, Smallpdf offers 30+ PDF tools to help prepare your files for printing. You can compress large files, convert from Word or PowerPoint, and merge multiple PDFs before you print.
Why choose Smallpdf?
You get a simple online interface—no installs or sign-ups needed. All processing is secure and GDPR-compliant (see our Trust Center). And with All Tools available in one place, you can handle every step, from editing to printing, in just a few clicks.
Ready to make your PDFs look perfect? Start your free trial to access all Smallpdf tools.
Troubleshooting and Advanced Tips for Enlarging PDFs
Enlarging PDFs can sometimes lead to cut-offs, low quality, or wasted paper. Use these quick checks before you hit Print.
Check your printer’s printable area: Most printers can’t print to the very edge of the paper. Set small margins to keep content visible.
Use print preview every time: It shows exactly what will print so you can fix cropping or scaling before wasting ink.
Pick the right paper size: Legal, A3, or tabloid paper gives you more space when enlarging big files.
Watch resolution on image-heavy PDFs: If photos look blurry, reduce the enlargement or start with a higher-quality file.
Test one page first: Print a single page before running the full job to confirm everything lines up.
Adjust margins if needed: Some printer settings let you reduce margins for a better fit.
Stay under 200% scaling where possible: Going higher can make text or images lose sharpness. For large formats, recreate the document or export it as a vector file.
Pro tip: If your file looks fuzzy after enlarging, open it in Smallpdf Edit PDF to tweak text size or replace low-resolution images before printing.
Enlarge Image-Heavy vs Text-Heavy PDFs
Not all PDFs respond to scaling the same way. Here’s how to get the best quality from each type.
Image-heavy PDFs: Enlarging scans, photos, or artwork can make them look blurry or pixelated. Start with the highest-resolution file available or use Smallpdf’s Compress PDF tool to reduce size without sacrificing clarity before you print.
Text-heavy PDFs: Text scales cleanly, so increasing the Custom Scale percentage or using Smallpdf Edit PDF to adjust font size usually keeps everything crisp. Always preview before printing to check page breaks and margins.
FAQs: Enlarging a PDF for Printing
How do I resize a PDF to print larger?
Use a print scaling option in your printer’s settings. Most printer dialogs have a “Scale,” “Fit to Page,” or “Fill Entire Paper” option that can increase the size of your printout.How to enlarge a PDF into a multi-page poster?
Enable “Poster” or “Tile” mode in your printer settings to split the PDF across multiple pages. These settings are found under “Page Sizing and Handling” and let you select overlap margins and cut marks for easier assembly.How to enlarge a PDF for printing on Windows?
On Windows, open the PDF and hit Ctrl+P. Look for options like “Fit,” “Custom Scale,” or “Scale to Fit” in the print dialog to adjust the size to fit your needs.How to enlarge a PDF for printing on Mac?
On a Mac, open the PDF in Preview and press Cmd+P. You’ll find scaling options under the “Preview” section, with choices like “Scale,” “Scale to Fit,” and “Fill Entire Paper.”How to enlarge PDF and print on multiple pages?
Enable “Poster” or “Tile” mode in your printer settings to split the PDF across multiple pages. Once printed, you can align and tape the pages together for a seamless larger design.How do I enlarge the size of a PDF file?
You can enlarge a PDF by adjusting print settings (scale percentage or poster mode) or by editing the PDF directly using tools like Smallpdf’s Edit PDF feature to increase font sizes.How can I make a PDF bigger without losing quality?
Keep enlargements under 150% when possible, use vector-based PDFs rather than image-heavy ones, and always check the print preview to ensure text remains crisp and readable.Turn complex statements into CSV in seconds with Pro
Related Articles
