Need print bleed for a clean, borderless finish? We’ll prep your file in Smallpdf, then add bleed and marks using two reliable layout apps.
If you’re sending a design to a print shop, bleed is one of the first things they’ll check. It extends your artwork past the trim line, so tiny cutting shifts don’t leave white slivers on the edge.
The catch is that most PDFs don’t gain bleed magically. You usually prep the artwork, then export with bleed settings from a page layout app.
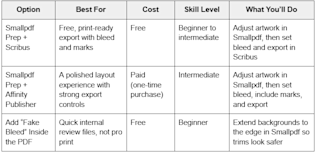
Below, we’ll cover three practical workflows. You’ll also get quick steps, a comparison table, printable templates, and fixes for the most common problems.
Best Way To Add Print Bleed in PDFs

Best way to add print bleed in PDFs
If you’re printing professionally, use Scribus or Affinity Publisher. The fake bleed approach helps with internal drafts, but it can’t replace real bleed settings in prepress exports.
How to Add Print Bleed in PDF: Quick Step-By-Step
If you want the fast version, here’s the flow most people use:
- Prep the PDF so artwork reaches the trim edge (we’ll do this in Smallpdf).
- Add bleed in a layout app, then export a new PDF with bleed enabled.
- Add crop marks if your printer requests them.
- Send the exported PDF to your printer, and include the bleed size in your notes.
Now let’s walk through each method with clear steps.
How To Add Print Bleed in PDFs: Step-by-Step Guide
Step 1: Check If Your Artwork Reaches the Trim Edge
Open your PDF and zoom in near the edges. If your background, color, or photo stops before the page edge, your bleed will turn into empty space. That’s the most common issue we see with print files.
If the design already runs to the edge, you can move straight to Scribus or Affinity Publisher.
Step 2: Prep the File in Smallpdf Before You Add Bleed
Smallpdf can’t assign true bleed boxes as a layout app can, but we can help you prep the artwork so your bleed area isn’t blank.
Use Smallpdf Edit PDF to:
- Extend background shapes or images so they reach the page edge.
- Add a full-page background image if your current design floats in the middle.
- Fix small layout problems, like a logo too close to the edge.
If your PDF is heavy, run Smallpdf Compress PDF before exporting it to a layout app. It keeps the file easier to handle without changing the page size.
Step 3: Add Real Bleed and Export With a Layout App
Once your artwork is ready, pick Scribus or Affinity Publisher to set bleed and export a print-ready PDF. Both can include crop marks and other printer marks.
We’ll show both options next, with exact menu paths and settings.
Add Print Bleed in PDFs Using Scribus
Scribus is open source and free, and it’s a solid option when you need true prepress exports without paying for a subscription. You’ll set the bleed in the document settings, then export using the prepress options.
Step 1: Open the PDF in Scribus
Install Scribus from the official Scribus site, then launch the app. Open your file using “File” > “Open”. Once your PDF is loaded, confirm the page size matches your intended trim size.
Step 2: Set the Bleed Values in Document Setup
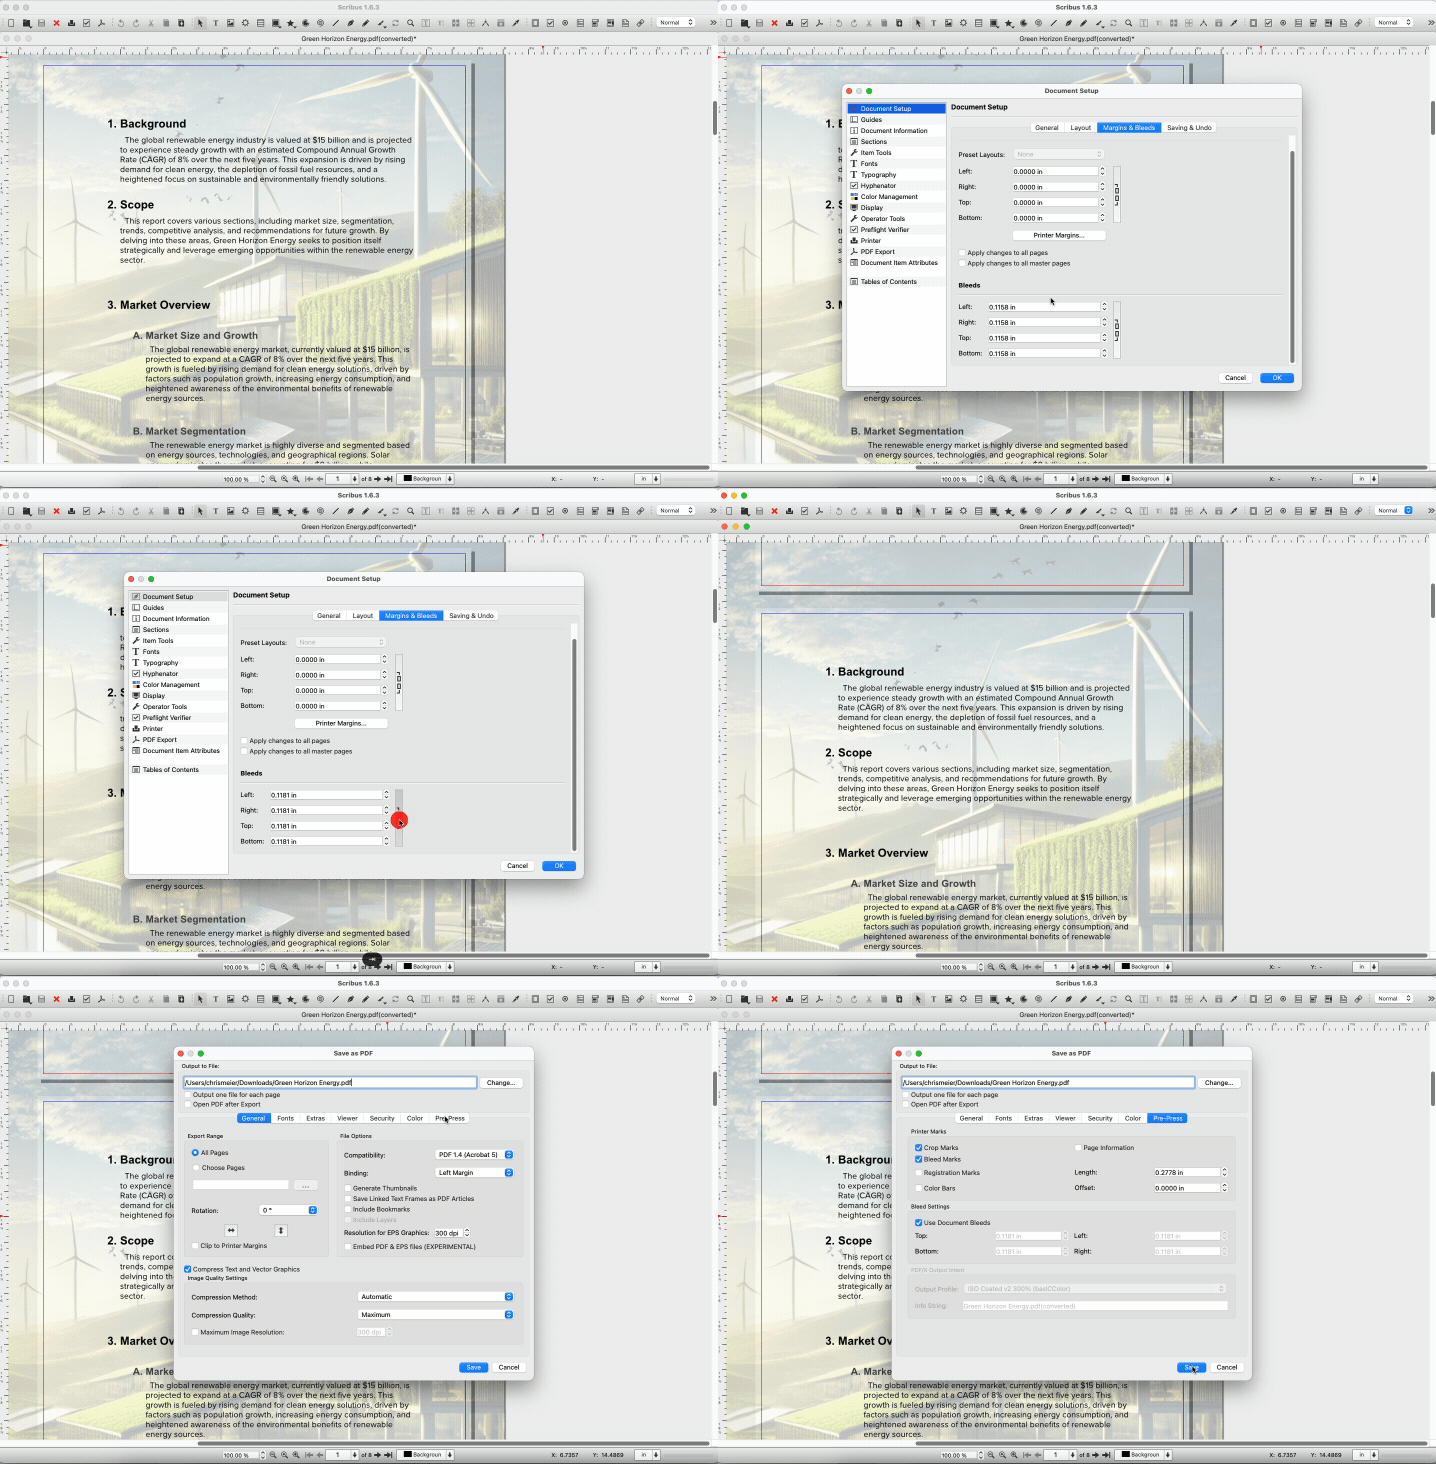
Go to “File” > “Document Setup”. Open the “Margins & Bleeds” tab, then scroll to the “Bleeds” section.
A common standard is 3 mm bleed on all sides. Scribus may display inches, depending on your settings. If you’re working in inches, 3 mm is about 0.118 in.
Set the top, bottom, left, and right bleed to the same value. Keeping it consistent helps printers and avoids accidental offsets.
Step 3: Export a Print-Ready PDF With Bleed Enabled
Export using “File” > “Export” > “Save as PDF”. Open the “Pre-Press” tab and enable “Use Document Bleeds” under bleed settings.

Adding print bleed in PDFs using Scribus
If your printer wants crop marks, enable them in the same export area under printer marks. Save the exported file with a clear name, like “ProjectName_Print_Bleed.pdf”.
Add Print Bleed in PDFs Using Affinity Publisher
Affinity Publisher is a paid option with a clean interface and strong print controls. It’s a good fit if you regularly make print-ready PDFs and want fewer setting issues.
Step 1: Open the PDF and Confirm Document Settings
Install Affinity Publisher, then open your PDF. Go to “File” > “Document Setup” and check your page size first. Your trim size should match the final printed size, not the bleed size.
Step 2: Add Bleed in the Bleed Settings
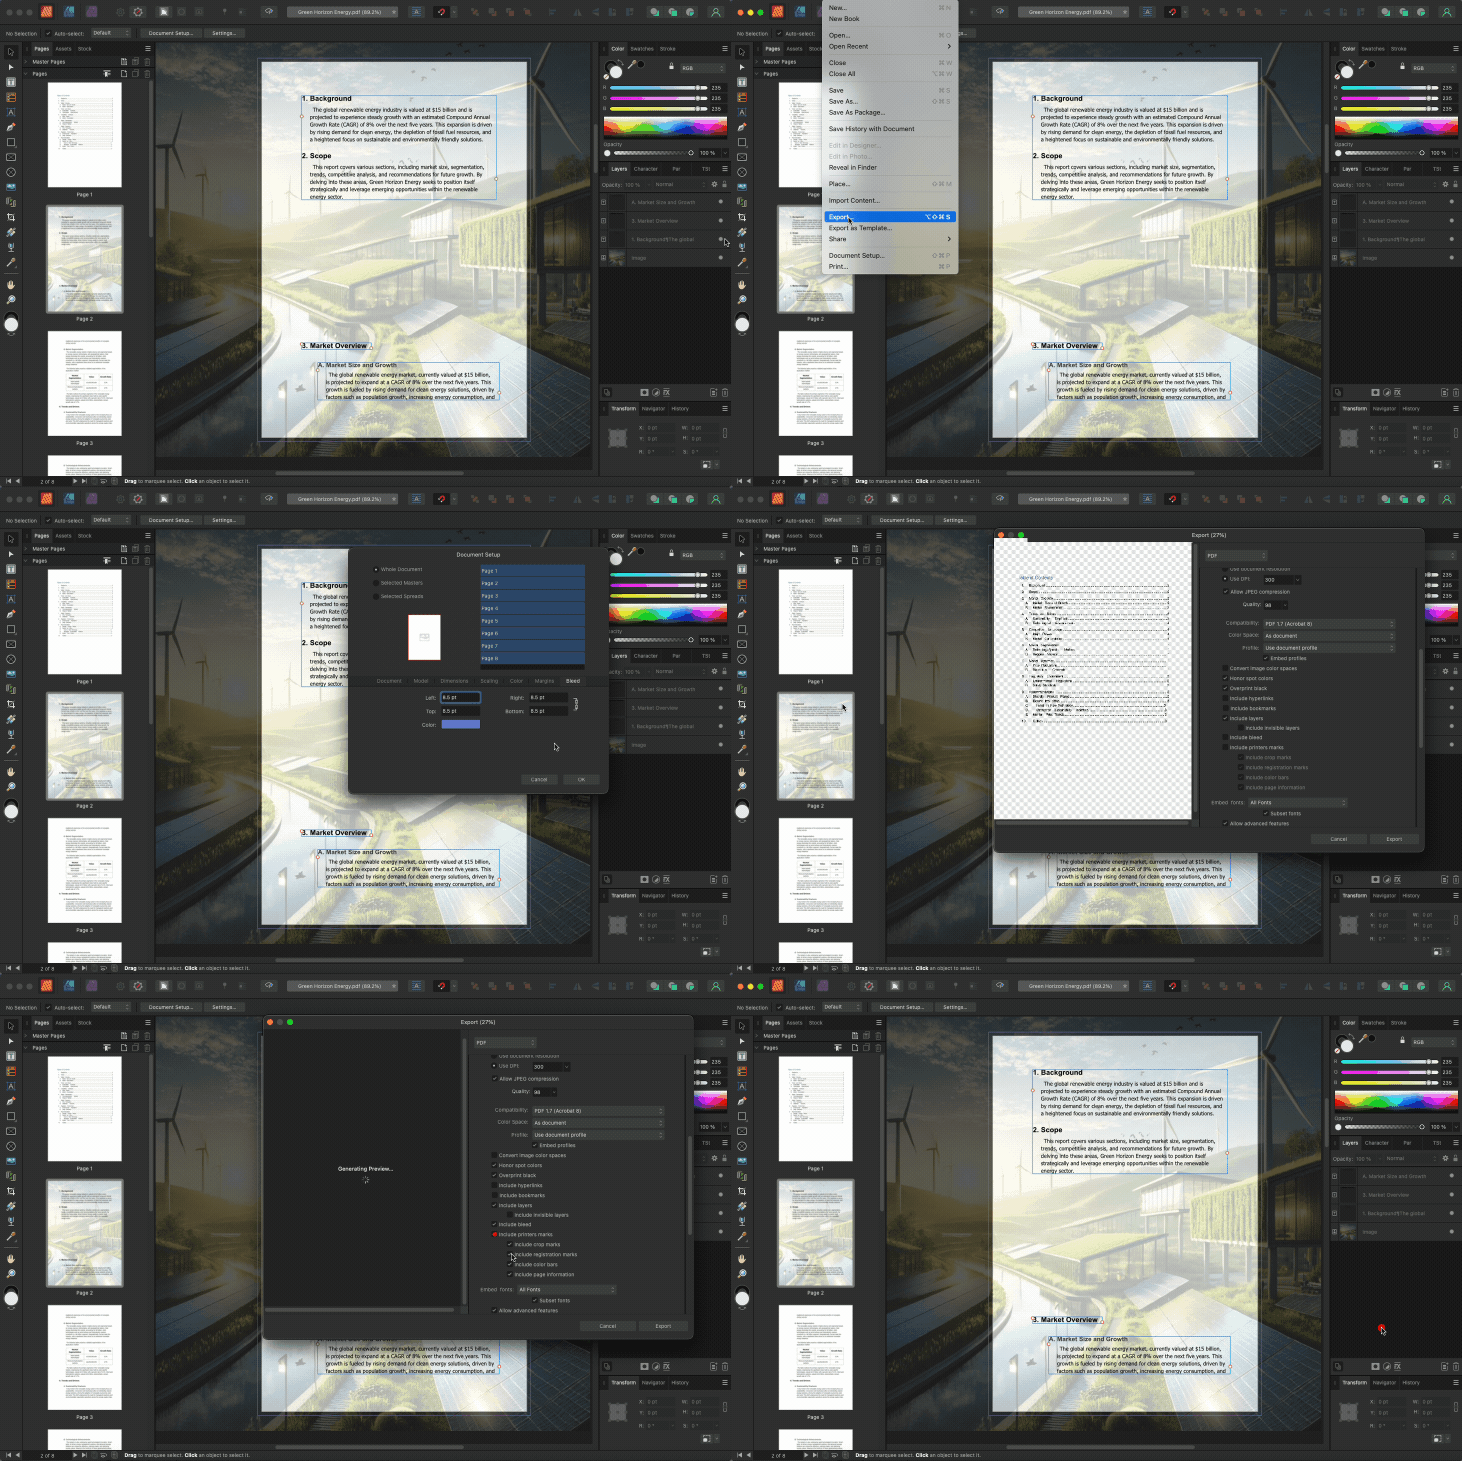
In “Document Setup”, open the bleed settings and set the same bleed value on all sides. Affinity may show points by default. As a quick reference, 3 mm is about 8.5 pt.
If your printer asks for a different bleed, use their number. Some large-format jobs require larger bleeds, and many business card printers adhere to their own specifications.
Step 3: Export With Bleed and Marks Included
Go to “File” > “Export”, choose PDF, then open the advanced export options. Enable “Include bleed”.

Adding print bleed in PDFs using Affinity Publisher
If you need crop marks or other printer marks, enable them right below the bleed option. Export the file and name it clearly so nobody grabs the wrong version later.
Add Fake Bleed Inside the PDF for Drafts
This method is useful when you’re sharing a PDF for review, and you want it to look closer to the final trim. It does not replace real bleed settings for professional printing, but it can reduce surprises before the final export.
Step 1: Extend Backgrounds to the Page Edge in Smallpdf
Open Edit PDF, and add or stretch a background element so it covers the full page. If your design uses a photo background, place a larger version behind the content.
Step 2: Keep Critical Text Inside a Safe Margin
Even with bleed, keep text and logos away from the trim. A practical guideline is to keep important elements at least 3 mm to 5 mm inside the trim line, unless your printer specifies something else.
Step 3: Save a Review Copy Separately
Export a separate “review” version, so nobody mistakes it for the print file. When you’re ready to print, switch to Scribus or Affinity Publisher to apply real bleed and marks.
Downloadable Print Bleed Templates
If you’re starting from scratch, templates save time and prevent sizing mistakes. A good template gives you the trim box, a safe zone guide, and a clear bleed area.
Here are templates we recommend offering as simple PDFs:
- US Letter (8.5 x 11 in) with 3 mm bleed and a safe zone guide.
- A4 (210 x 297 mm) with 3 mm bleed and a safe zone guide.
- Business card (US and EU standard sizes) with 3 mm bleed and a safe zone guide.
Once you download a template, you can place your artwork on top, then use Edit PDF to add text, logos, and images before exporting through Scribus or Affinity Publisher.
Understanding Bleed and Crop Marks
Bleed is the extra printed area beyond the final cut line. Crop marks show the printer exactly where the trim should happen. Together, they help avoid visible white edges caused by small cutting shifts.
If a poster background ends exactly at the trim edge, even a tiny cut offset can expose unprinted paper. If the background continues into the bleed area, the trim still lands on printed ink, and the final edge looks clean.
Troubleshooting Print Bleed Problems
If your print shop flags your file, it’s usually one of these issues.
- Your bleed area is blank. Your artwork stops at the trim edge. Fix it in Smallpdf first by extending the background, then re-export with bleed enabled.
- The page size is wrong. Your trim size got changed. Confirm the document setup uses the intended trim size before you add bleed.
- Marks are missing. Some printers want crop marks, some don’t. Re-export and enable printer marks if requested.
- Text is too close to the edge. Bleed doesn’t protect text. Move important elements inward before exporting.
- Your printer wants a different bleed size. Use their spec. If they say 5 mm, export 5 mm.
If you need to make quick content edits before re-exporting, Smallpdf Edit PDF is the fastest place to adjust text, reposition elements, or swap an image without rebuilding the whole file.
Prepare Your PDF for Print
Bleed and crop marks are small details that make print files look professional. Start by prepping your artwork in Smallpdf, then export with proper bleed settings in Scribus or Affinity Publisher.
If you want a smoother print handoff, keep a template on hand and name your final export clearly so the printer gets the right file the first time.
Frequently Asked Questions
What are crop marks and bleed in a PDF?
Crop marks are small lines that show where paper should be trimmed. Bleed is the extra design area that extends past the trim line. Together, they reduce the chance of white edges caused by slight cutting shifts.
When do I need to add print bleed in PDFs?
Add bleed when a background color, image, or pattern touches the page edge. If your design has a white margin by choice, you don’t need bleed. For most full-bleed print jobs, your printer will expect it.
How do I add bleed and crop marks to a PDF for free?
Use Scribus. It lets you set a bleed value in document setup and export a PDF with bleed enabled. You can also include crop marks during export if your print provider asks for them.
What bleed size should I use for professional printing?
Many printers accept 3 mm on all sides, but this isn’t universal. Always check your print provider’s spec sheet and match their required bleed size in your export settings.
Can Smallpdf add true bleed settings to a PDF?
Smallpdf is best for prepping the content before you export for print. You can extend backgrounds, fix layout issues, and clean up pages in Smallpdf Edit PDF, then use Scribus or Affinity Publisher to apply real bleed and export the final file.
