- CompressConvertAI PDF
- Organize
- View & Edit
- Convert from PDF
- Convert to PDF
- SignMoreScan
How to Create Input Fields in PDFs
Add fillable fields in PDF in minutes. Create text boxes, checkboxes, and signature areas without extra software. Fast, Free, and no sign-up required.
If you want people to type directly into your PDF instead of printing and scribbling, you need fillable fields.
Fillable fields are also called input fields, and in practice, they mean the same thing: clickable areas in a PDF where someone can type, tick a box, pick from a list, or sign.
We’ll walk through how to add fillable fields in PDF with Smallpdf and free tools like Mac Preview, plus how to fix common issues when fields do not behave as expected.
Quick Start: How To Add Fillable Fields in PDF
Quick start: Use the annotator below to upload or drag-and-drop your PDF and add field areas, checkboxes, and signature spots.
These visual input areas guide people to the right places on your form and work across almost all PDF viewers.
What Are Fillable Fields in PDFs?
Before you start editing, it helps to understand what you are adding.
Input Fields vs. Fillable Fields
You will often see the terms “input fields” and “fillable fields” used together. In simple terms:
Input fields focus on the action: places where the user inputs data.
Fillable fields focus on the format: areas in a PDF that can be filled.
In this guide, we use them interchangeably. In both cases, you are creating parts of a PDF that feel more like a form than a static document.
Common Types of Fillable Fields
Most forms rely on a few basic field types:
Text fields - for names, addresses, emails, and comments
Checkboxes - for “tick all that apply” lists
Radio buttons - for single choices in a group
Dropdown menus - when you want a tidy list of options
Signature fields - for signing and dating documents
Once you know which of these you need, designing the layout becomes much easier.
How To Add Fillable Fields in PDF (Step-by-Step)
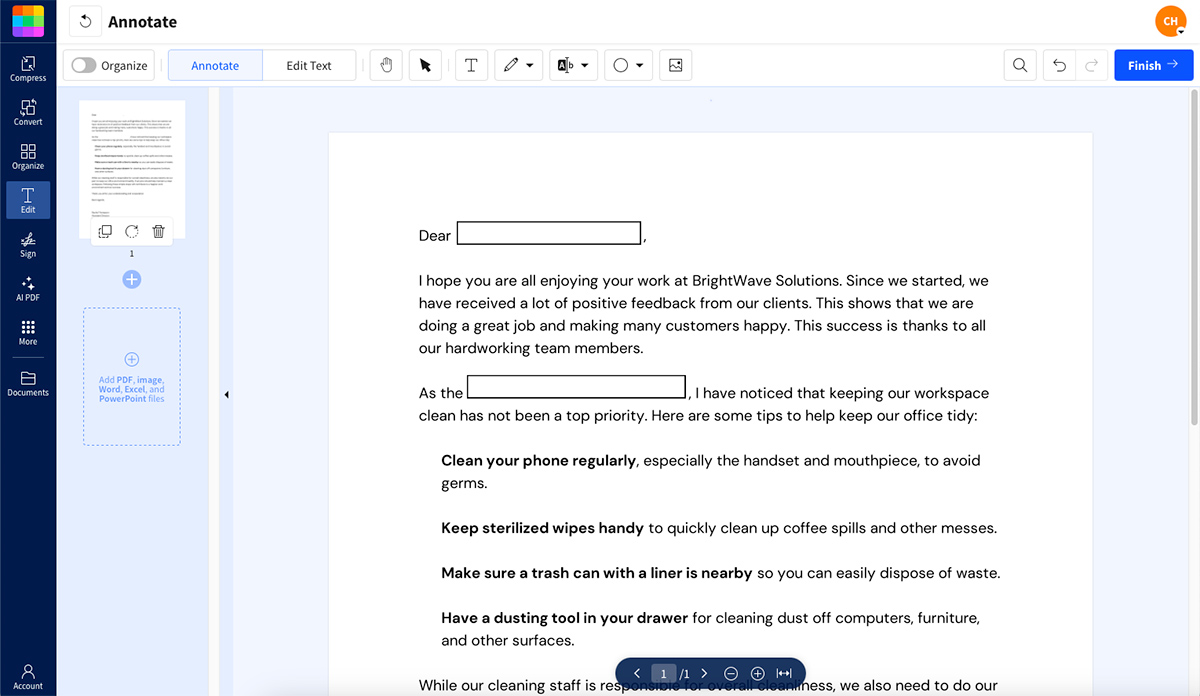
Smallpdf gives you a simple, browser-based way to design and mark up form areas on top of any PDF.
Step 1: Upload Your PDF
Open the PDF Annotator on Smallpdf.
Drag and drop your PDF, or click “Choose File” to browse.
You can also import from Google Drive, Dropbox, or OneDrive.
Your document opens in a clean editing view.
Quick start: Use the annotator below to upload or drag-and-drop your PDF and start annotating.
Step 2: Add Text Input Areas
To create places where people should type:
Select the “shape” tool and choose “Rectangle.”
Draw a rectangle where you want someone to enter text, such as next to “Name” or “Email.”
Adjust the border thickness and color so fields stand out but still look tidy.
These rectangles act as clear visual input zones that people can click and type into using standard PDF viewers that support annotations.
Step 3: Insert Checkboxes and Radio-Style Options
For multiple choice sections:
Draw small squares to act as checkboxes when several answers may be selected.
Draw small circles for radio-style options when only one answer should be chosen.
Place them next to each option and add clear labels.
This keeps your form organized and avoids confusion about where to click.
Step 4: Mark Dropdown-Style and Signature Fields
Even if your viewer doesn’t support true dropdown widgets, you can still guide people clearly.
Draw a rectangle with a small arrow symbol to show a “dropdown-style” area where they should choose from listed options.
Create larger rectangles labeled “Signature” and “Date” to show where signers should complete the form.
You can later combine this with Smallpdf eSign if you want people to sign digitally.
Step 5: Save, Test, and Share
When you are done:
Click “Finish” or download from the top-right area.
Open the PDF in your usual viewer to test navigation and typing.
Share the file as an attachment or create a secure link from Smallpdf.
Smallpdf works on Mac, Windows, Linux, and mobile browsers, so everyone sees the same structure.
Create Fillable PDFs From Word or Google Docs
If you have already built your form in Word or Google Docs, you can still turn it into an interactive PDF.
Step 1: Design the Layout in Your Editor
In Word or Google Docs:
Use clear labels like “First Name,” “Email,” and “Comments.”
Leave blank space or lines where fields should appear.
Use tables if you need everything lined up neatly.
When the layout looks right, you are ready to convert.
Step 2: Export and Add Fields in Smallpdf
Save or export your document as a PDF.
Upload it to Smallpdf PDF Annotator.
Add rectangles, checkboxes, and signature areas on top of the existing layout.
This gives you the best of both worlds: easy layout in your word processor and a PDF that feels like a proper form.
Adding Fillable Fields Without Acrobat (Free Options)
You do not need Adobe Acrobat to make a simple fillable PDF. There are free choices that cover the most common use cases.
1. Using Mac Preview for Basic Fields
Preview is handy for quick Mac-only tweaks:
Open your PDF in Preview.
Go to “Tools > Annotate,” then choose “Rectangle” or “Text.”
Draw boxes where you want people to type or sign.
Save the file when you are finished.
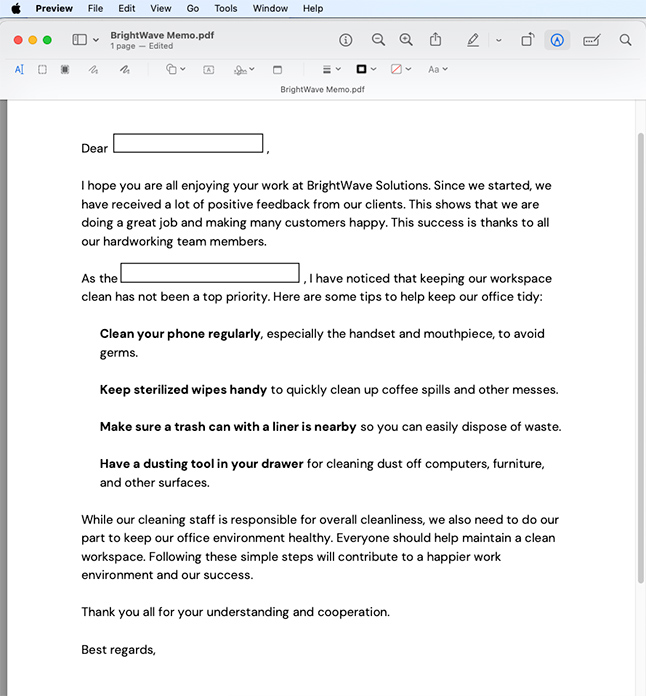
Preview is useful for one-off edits, but it’s limited. It can overwrite your original file and does not handle complex interactive forms or field properties very well.
2. Using Smallpdf Online for Cross-Platform Forms
Smallpdf runs in your browser on any device:
No installation needed
Same interface across Mac, Windows, and mobile
Easy to combine with other features like Compress PDF, Protect PDF, and eSign PDF.
You can start with the free plan and only consider Pro if you need heavy form work or larger files.
Advanced Field Options and Properties
Once you have the basics in place, you may want more control over how people fill out your forms.
1. Text Field Behavior
Consider:
Required vs optional fields, so you know what must be completed.
Character limits for things like ID numbers or postal codes.
Alignment and spacing to keep long answers tidy.
2. Choice Fields and Guidance
For checkboxes, radio buttons, and dropdown-style areas:
Use clear labels such as “Select all that apply” or “Choose one.”
Group related options visually to avoid confusion.
Keep the number of choices reasonable to reduce scroll time.
3. Signatures and Dates
Signature areas should:
Be wide enough for a full name.
Sit close to the related text or agreement.
Include a date field nearby for clarity.
These details make your PDFs feel professional and easy to complete.
Troubleshooting Fillable PDF Field Issues
Things don’t always work perfectly on the first try. Here are common issues and quick fixes.
1. Fields Are Not Clickable or Visible
Make sure you saved and re-opened the latest version of your PDF.
Test the file in a dedicated PDF viewer if a browser viewer seems limited.
Zoom in to see if the fields are simply too small to notice.
2. Text Looks Strange When People Type
Stick to standard fonts such as Arial, Times New Roman, or Helvetica in your base document.
Avoid mixing many different font styles and sizes in the same field area.
3. Existing Form Fields Do Not Behave as Expected
If you are working with a PDF that already has built-in form fields:
Some older files use XFA forms, which newer viewers may not support well.
Converting the file to a standard PDF with Smallpdf and then rebuilding simple fields often gives more reliable results.
4. Signature Fields Are Hard To Find
Add clear labels like “Sign here” and “Print name.”
Use a slightly thicker border or a different color around signature areas.
Keep signature fields near the end of the document where people expect them.
Testing your form once, as if you were the user, usually catches most of these issues.
Why Use Smallpdf To Add and Manage Fillable PDFs?
Preview and other free tools can help in a pinch, but Smallpdf brings everything into one place:
Works on any device with a browser
Connects with popular cloud storage services
Lets you compress, protect, merge, and sign the same forms you create
Uses encryption and automatic file deletion to keep documents secure
You can start with a single basic form and gradually build a full, consistent set of PDFs your team can reuse.
Want to Add Fillable Fields in PDF for Free?
Frequently Asked Questions
How do I add a fillable field to an existing PDF?
Upload the PDF to Smallpdf PDF Annotator, then draw text and shape areas where you want people to type, tick, or sign. Save and test the result in your preferred PDF viewer.How do I add editable fields in PDF for free?
Use free tools such as Mac Preview for simple boxes or Smallpdf’s online editor for a more flexible, cross-platform layout. Both let you create fields without a paid subscription.How do I make a PDF fillable in Smallpdf?
Open your PDF in Smallpdf, add labeled text areas, checkboxes, and signature zones using the shape and text tools, then download the updated file. You can also combine this with eSign for signing workflows.What is the easiest way to create a fillable PDF?
Design the layout in Word or Google Docs, export as PDF, or you can simply upload the file directly into PDF Annotator, and Smallpdf converts the file to PDF, and you can add fillable fields.How can I fill details in a PDF for free?
Open the PDF in a modern browser or PDF viewer and click into existing fields if they are already fillable. If not, upload the file to Smallpdf and use the text tool to type directly onto the document before saving a new copy.Create PDF input fields faster with Smallpdf Pro
Related Articles
