How to Create a Fillable PDF from Excel
Need to know how to create a fillable PDF from Excel? Use Smallpdf to convert your spreadsheet to PDF, add fillable fields, then download your finished form.
Quick Takeaways
Excel works well for designing a form because cells, borders, labels, and checkboxes make it easy to create a structured layout.
Set up the worksheet for printing before converting it, especially the print area, page orientation, margins, and gridlines.
Smallpdf's Excel to PDF converter accepts XLS and XLSX files and preserves the spreadsheet's visible tables, borders, and layout.
Excel formulas don't remain live calculations once the worksheet becomes a PDF.
Smallpdf's PDF Form Filler lets you add text, dates, checkmarks, and signatures to PDFs, including documents that weren't originally designed as fillable forms.
Always test the finished PDF before sharing it, especially if your Excel layout contains merged cells, formulas, or tightly spaced fields.
Excel might not be the first thing that comes to mind when you think of forms, but it's surprisingly handy for building one.
You've already got rows, columns, borders, checkboxes, and plenty of control over spacing. That makes Excel a practical place to lay out anything from an expense form to an inspection checklist.
The important bit is knowing where Excel's job ends. You can design a fillable form in Excel, but converting the spreadsheet to PDF turns the worksheet into a fixed-layout document. If you want people to type, tick boxes, add dates, or sign the finished PDF, you'll need to add those elements at the PDF stage.
So, if you're wondering how to create a form in Excel and turn it into a PDF people can complete digitally, here's the whole process from start to finish.
How to Create a Fillable PDF from Excel
The easiest way to think about this is as a two-part job.
First, you create the form in Excel and make sure the layout looks exactly how you want it. Then you convert that spreadsheet to PDF and add the places where someone will enter their answers.
Step 1: Build the Form Layout in Excel
Start with a blank worksheet and decide what information you need to collect.
For example, a simple employee expense form might include:
Employee name
Department
Date
Expense category
Description
Amount
Approval
Signature
Type each label into its own cell and leave enough space beside or underneath it for the answer.
Cells are especially useful here because you can resize rows and columns until everything lines up neatly. You can also add borders around answer areas rather than relying on underscores or strings of blank spaces.
For longer answers, make the relevant rows taller and use a wider group of cells. If you're creating an address section, for example, give it enough room for several lines instead of squeezing everything into a single narrow cell.
The simplest way to make a fillable form in Excel is to start by using the spreadsheet grid as the framework for the form rather than treating it like an ordinary data table.
Step 2: Add Form-Style Elements
Next, add any visual controls your form needs.
Checkboxes are built into current versions of Excel for Microsoft 365 and Excel for Microsoft 365 for Mac. Select the cells where you want them, then choose “Insert,” and “Checkbox.”
You could use these for things like:
Yes / No choices
Items completed
Consent options
Categories
Approval status
Remember that these are Excel elements at this stage. They help you design and use the spreadsheet version of the form, but you shouldn't assume they'll remain interactive after PDF conversion.
For text responses, you usually don't need an Excel control at all. A clearly labelled blank cell or bordered area gives you the visual structure you need before you add PDF fields later.
You can also use fill colors, bold headings, and borders to separate sections such as “Contact Details,” “Payment Information,” or “Manager Approval.”
Try not to overdesign it. A form should make it immediately obvious what goes where.
Step 3: Prepare the Sheet for PDF Conversion
Before converting anything, check how the worksheet will fit on a page.
Excel lets you define exactly which cells belong in the print area. Select the part of the worksheet containing your form, then go to “Page Layout,” “Print Area,” and “Set Print Area.” Excel saves that print area with the workbook.
Then open “Print Preview” and check:
Is the entire form on the page?
Has anything spilled onto an unexpected second page?
Are labels being cut off?
Is portrait or landscape orientation better?
Are the margins too wide?
Are answer areas large enough?
It's much easier to fix these things in Excel than after the PDF has been created.
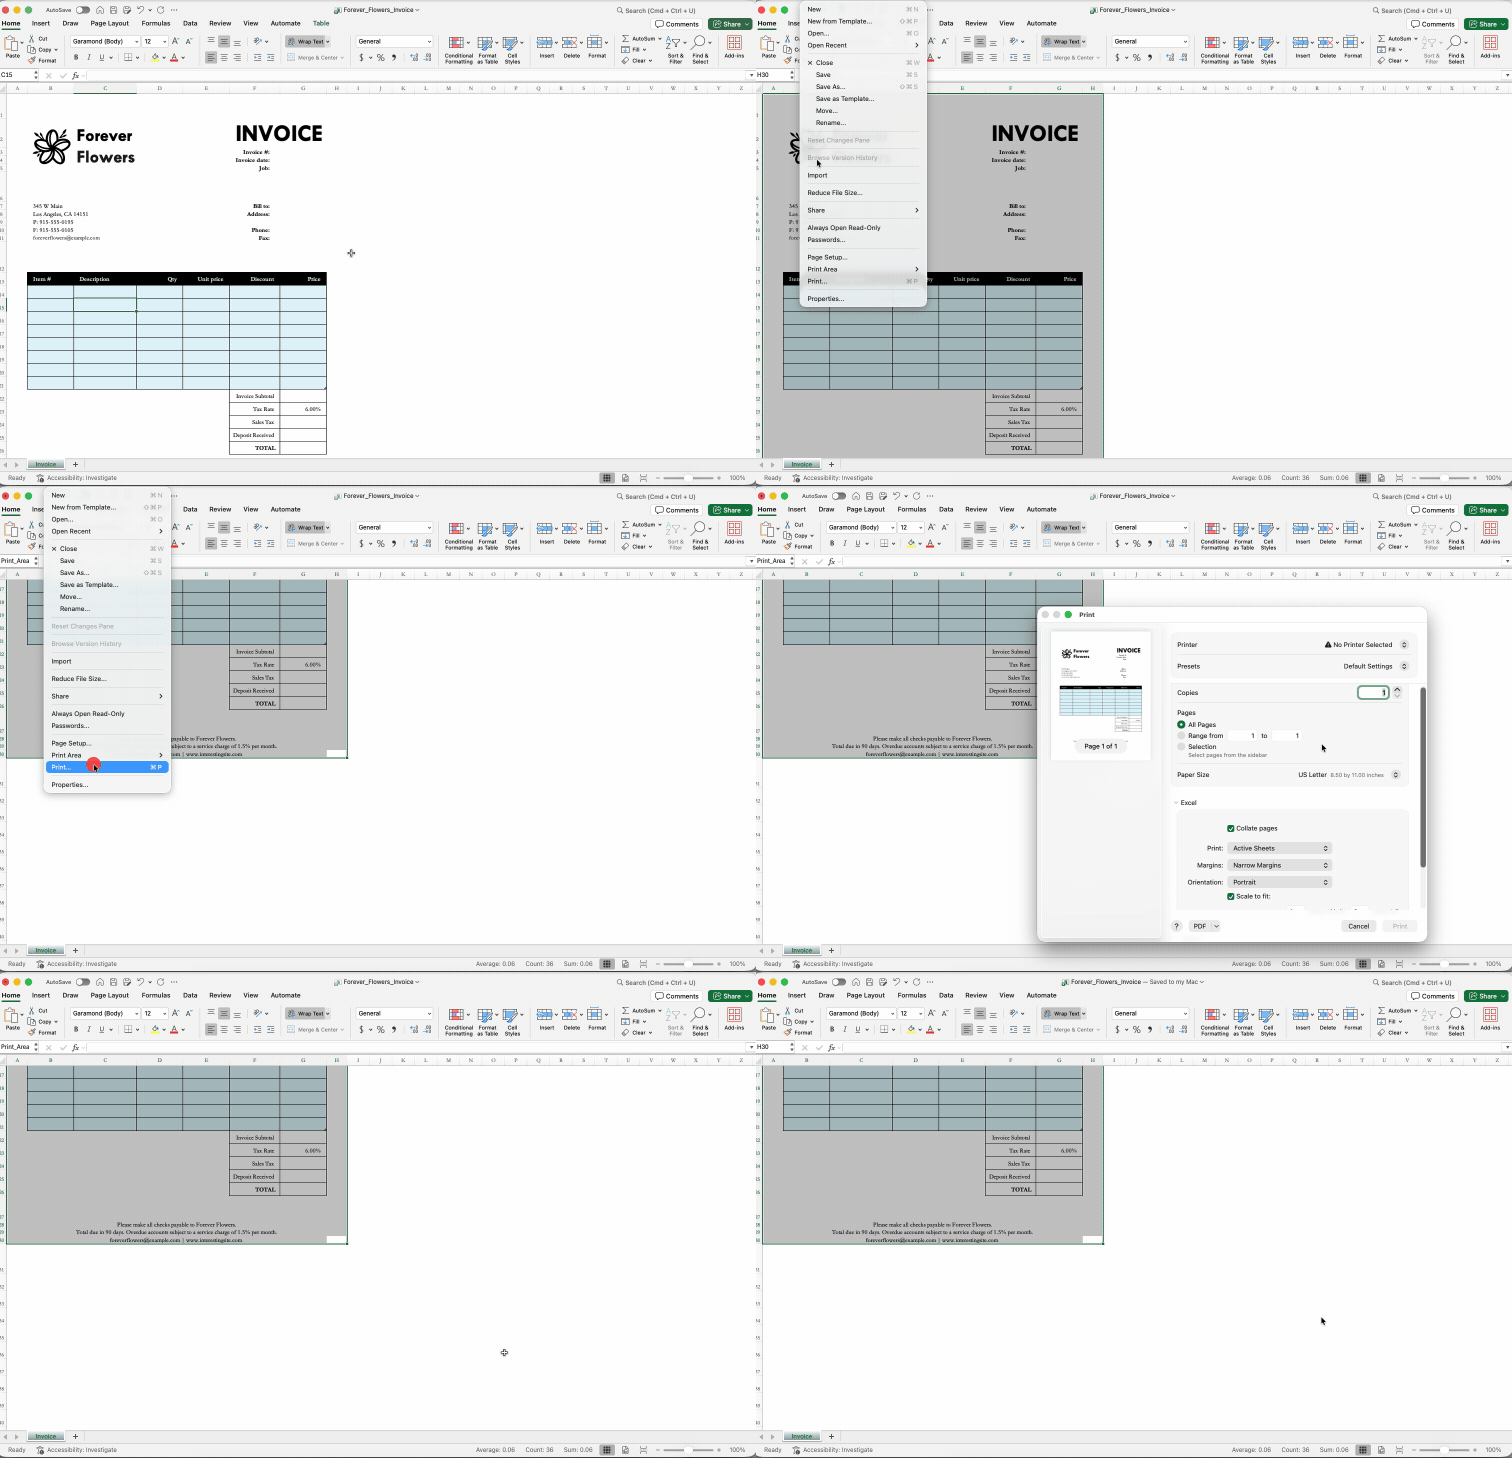
If your form is meant to fit on one page, pay particular attention to scaling. Shrinking a wide worksheet too aggressively can leave you with tiny text and fields nobody wants to fill in.
Step 4: Convert the Excel Form to PDF
Once the worksheet looks right, open Smallpdf's Excel to PDF converter.
Then:
Upload your XLS or XLSX file.
Wait for Smallpdf to convert the spreadsheet.
Download the PDF, or continue working with it using another Smallpdf tool.
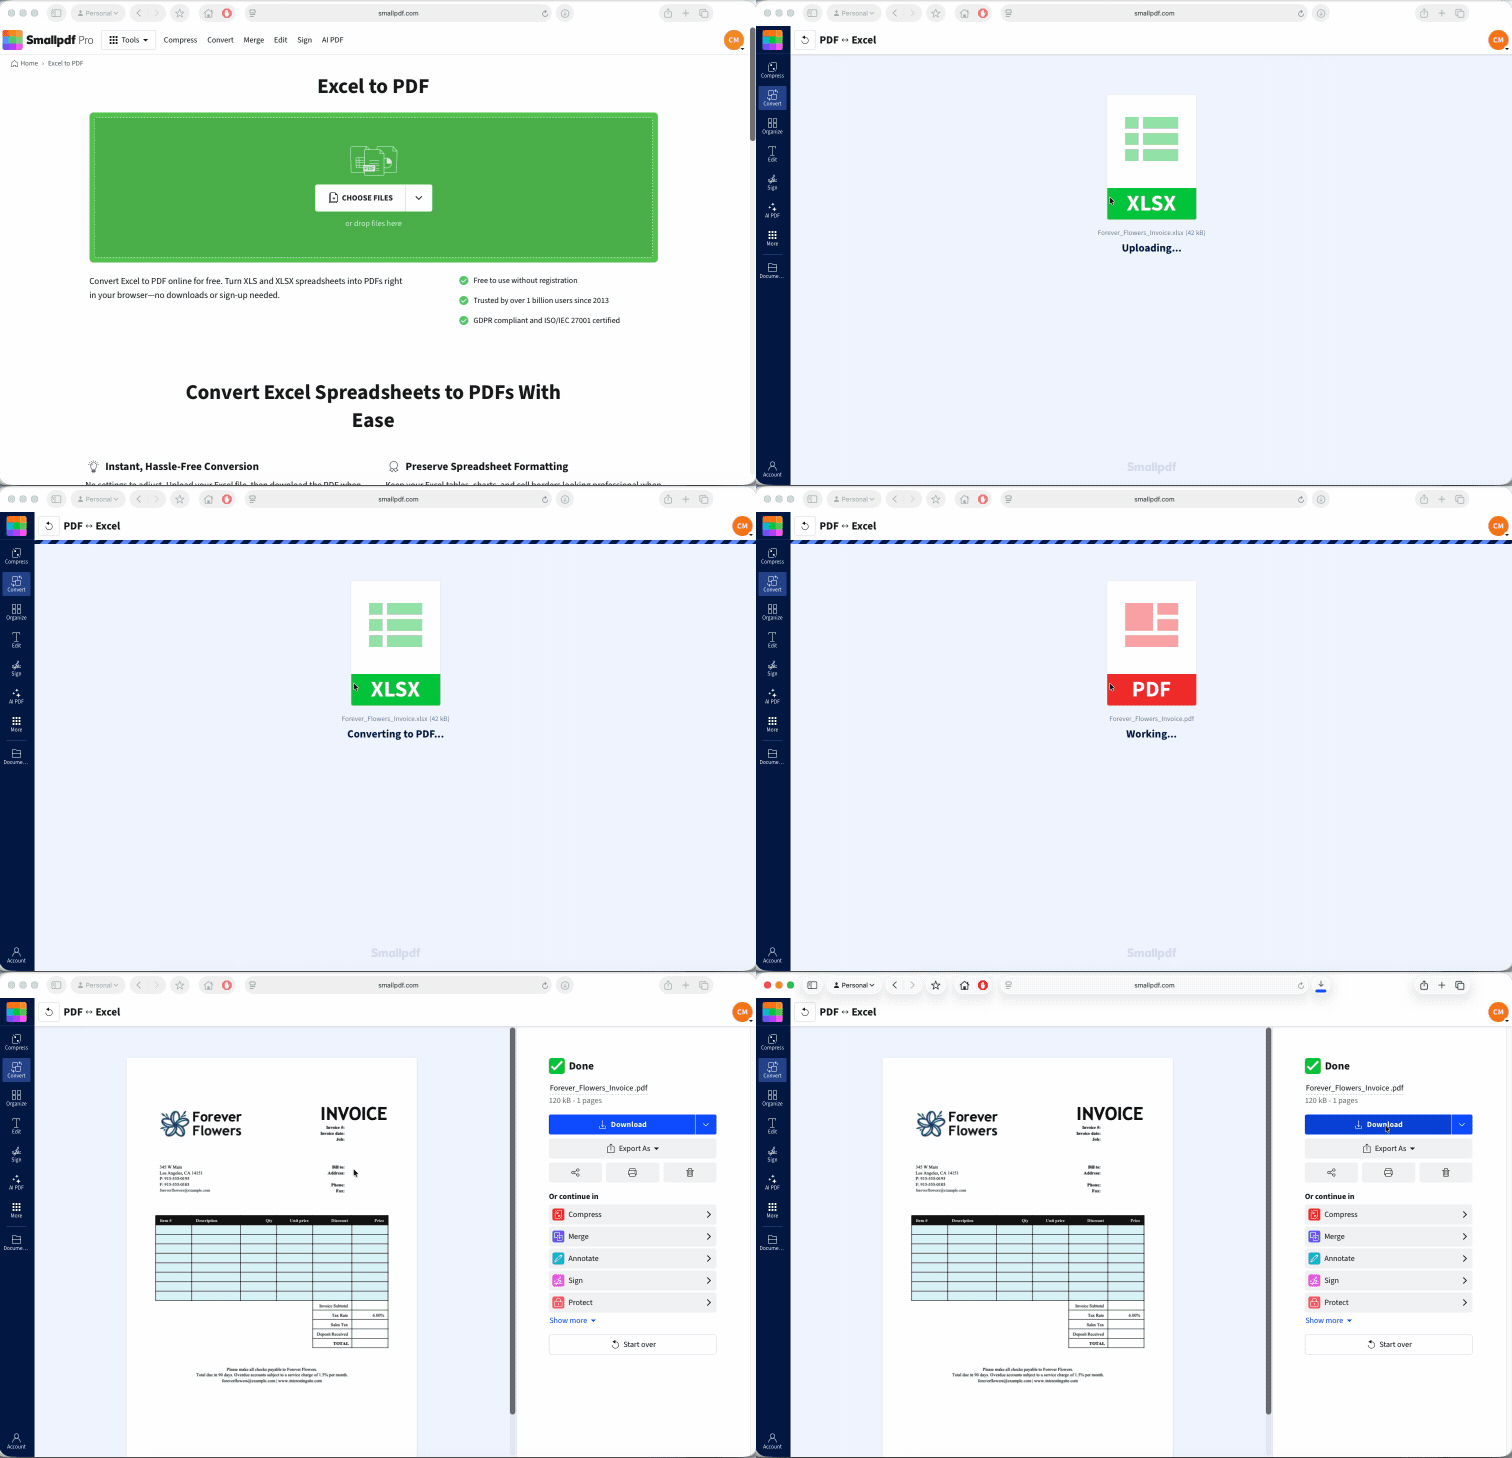
Smallpdf's converter is browser-based and supports both XLS and XLSX files. It is designed to preserve visible spreadsheet elements such as tables, cell borders, charts, and layout during conversion.
At this point, you've successfully created a PDF from your Excel form.
But there's one more step if you want people to complete it digitally.
Step 5: Add Fillable Areas to the PDF
Open the converted document in Smallpdf's PDF Form Filler.
The tool lets you add text, dates, checkboxes, and digital signatures directly to a PDF. It can also be used with PDFs that weren't originally created with fillable fields.
Place the relevant elements over the spaces you prepared in Excel.
For example:
Add a text area beside “Full Name.”
Add another beside “Email Address.”
Place a date where you've labelled “Date.”
Add a signature where approval is required.
This is the step that turns your neatly designed spreadsheet form into something people can complete without printing it.
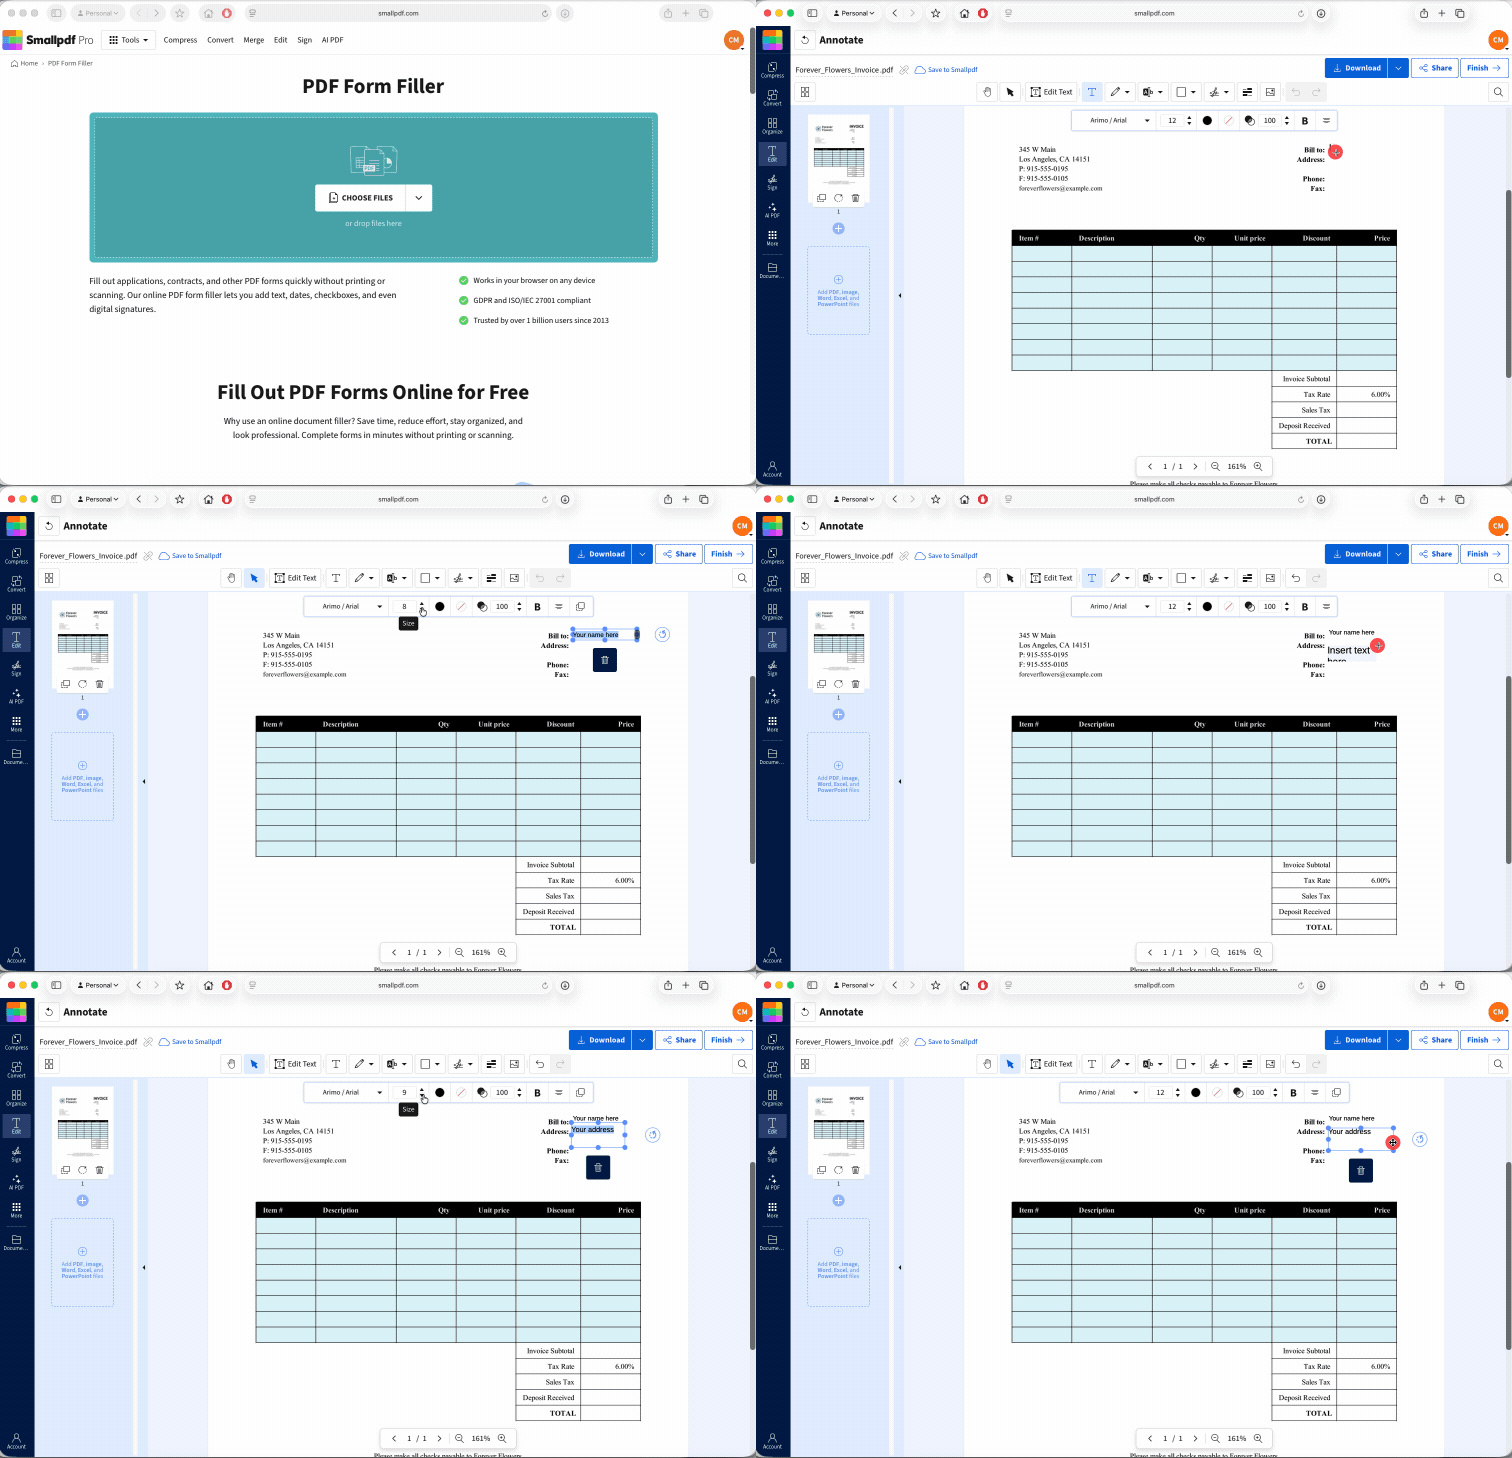
So, when you're trying to create a fillable PDF from Excel, it helps to separate the two jobs. Excel creates the structure, while the PDF tool handles the digital completion stage.
And if your form needs a bit more work after that, you can keep going with Smallpdf. We have 30+ PDF tools for jobs like converting, compressing, editing, signing, merging, and organizing documents. Many tools are available for free with usage limits, while Smallpdf Pro gives you unlimited access to all the tools and other premium features. You can also try Pro free for 7 days before deciding whether it’s right for you.
Step 6: Test the Finished Form
Don't send it out quite yet.
Open the completed PDF as if you were the person receiving it and work through the whole form.
Check that:
There's enough room for realistic answers.
Text doesn't overlap your Excel labels.
Checkboxes line up with the correct choices.
Dates fit comfortably.
Nothing has shifted onto another page.
The signature area is large enough.
Instructions are clear without someone having to ask what you meant.
If you're creating a form that will be reused regularly, this test is worth a couple of minutes. Fixing a field once is much easier than explaining the same confusing form to 20 different people.
Why Are My Excel Gridlines Showing in the PDF?
Because Excel is built around a grid, it's easy to end up with lines you never intended to include in the finished form.
Gridlines and borders aren't the same thing.
Borders are formatting you've deliberately added to cells. They're useful when you want to outline a table, answer box, or section.
Gridlines are the faint lines Excel uses to show where cells begin and end while you're working.
In the desktop version of Excel, gridline printing is controlled under Page Layout,” “Sheet Options,” select “Gridlines,” then “Print.”
If you're seeing unwanted gridlines in your PDF, go back to Excel and make sure the option to print gridlines isn't selected.
Then use actual cell borders only where you want visible lines.
This usually gives an Excel fillable form a much cleaner appearance. You keep the boxes people need while getting rid of the spreadsheet look everywhere else.
Also check “Print Preview” before converting again. What you see there is a much better guide to the eventual PDF than the normal worksheet view.
Will Excel Formulas Still Work in the Fillable PDF?
No. Think of the PDF as a finished version of what Excel was displaying when you converted it.
Your Excel workbook may contain formulas such as:
=SUM(F6:F12)
Those calculations still exist in the original spreadsheet, but the PDF doesn't become an Excel workbook in disguise.
Smallpdf preserves the visible spreadsheet formatting when converting Excel files to PDF, but the resulting PDF is a different document format intended to preserve the layout for viewing and sharing.
For example, imagine you've built an expense claim form where Excel automatically totals five expense rows.
If the amounts are already entered before conversion, the calculated total can appear in the PDF.
But if you convert a blank form and someone later types new amounts into the PDF, the original Excel formula isn't sitting behind those PDF fields waiting to recalculate the total.
If automatic calculations are important, keep the Excel version as your working document and use the PDF when you need a stable form for completion, sharing, or signing.
The same principle applies to other Excel features such as formulas that pull information from another worksheet or calculate dates. What you see can carry across visually, but the spreadsheet logic itself doesn't become PDF functionality.
Frequently Asked Questions About Creating Fillable PDFs from Excel
Can I add a signature field to a fillable PDF made from Excel?
Yes. Leave space for the signature in your Excel layout, convert the sheet to PDF, then add the signature in our PDF Form Filler. It’s better to add the signature at the PDF stage, once the layout is final.What happens to merged cells when I convert Excel to a fillable PDF?
Merged cells should carry across as part of the visible layout, but they can make spacing less predictable if the form is heavily formatted. Check the converted PDF before adding fields and fix any alignment issues in the Excel file first.Why do my fields shift position when I update the Excel file?
Because changing rows, columns, margins, or spacing in Excel can alter the layout of the newly converted PDF. Finish the spreadsheet design first, then convert it and add the fillable fields once the structure is final.Can I create a fillable PDF from Excel on a Mac?
Yes. Create and format the form in Excel for Mac, convert it with our Excel to PDF tool, then add text, dates, checkboxes, or signatures with PDF Form Filler. The workflow is essentially the same as on Windows. And that's the trick to create a fillable PDF from Excel. Don't ask one file format to do both jobs. Let Excel handle the neat rows, labels, borders, and structure, then let the PDF handle the information people need to enter. You'll end up with a form that looks organized, stays in place when shared, and doesn't require anyone to print it just to write their name in a box.Turn Excel sheets into fillable PDFs faster with Pro